


eBook
Related collections and offers
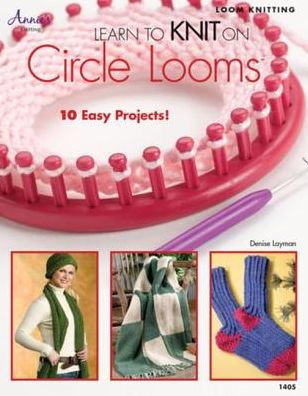
Overview

Product Details
| ISBN-13: | 9781573676311 |
|---|---|
| Publisher: | Annie's |
| Publication date: | 03/01/2006 |
| Sold by: | Barnes & Noble |
| Format: | eBook |
| Pages: | 32 |
| Sales rank: | 578,720 |
| File size: | 7 MB |
Read an Excerpt
Learn to Knit on Circle Looms
10 Easy Projects!
By Denise Layman
Annie's
Copyright © 2014 Annie'sAll rights reserved.
ISBN: 978-1-59012-158-0
CHAPTER 1
General Directions
Materials
Knifty Knitter looms from Provo Craft (Our photographed items were designed with the Knifty Knitter circle looms. Although you can use other circular looms, such as the In the Attic Looms, the gauge may be slightly off.)
Knitting tool
Crochet hook
Yarn needle
Techniques
Casting On
1. Tie a slip knot at the end of your yarn (check the pattern for the number of strands to be wrapped), leaving a 3-inch tail. Place this knot on the holding peg, and pull gently to tighten, Photo 1.
Note: After knitting two rows, the slip knot should be removed from the holding peg.
2. With your working yarn held in your left hand on the inside of the loom, wrap each peg in a counterclockwise direction starting on the first peg to the left of the holding peg. Work your way around the loom, going in a clockwise direction until there is one loop on each peg. Don't wrap too tightly, Photo 2.
3. Work your way around the loom sliding each loop halfway down each peg.
4. Continue to wrap your working yarn around the loom a second time until there are two loops on each peg.
Basic Stitches
Knitting on a knitting loom yields results similar to those of knitting with circular needles. The basic stitches used on the knitting loom are the Knit Stitch and the Purl Stitch. Alternating rows of these two stitches will result in a garter stitch that is the same on both sides of the piece.
Knit Stitch
1. Cast on and wrap two loops on number of pegs as directed in the pattern.
2. Start with the first peg to the left of your holding peg. Use your knitting tool to take the bottom loop and pull it up and over the top loop and over the top of the peg, Photo 3.
3. Continue in this manner, working in a clockwise direction around the loom until all pegs only have one loop remaining on them. This is one round.
Purl Stitch
1. Wrap one loop on number of pegs as directed in the pattern.
2. Lay your working yarn across the front of the pegs, just below the first wrapped loop, Photo 4.
3. Using your knitting tool, reach down through the wrapped loop on the first peg and pull the working yarn up through the loop, forming another loop, Photo 5.
4. Pull the original wrapped loop off the peg, Photo 6, and place the newly formed loop on the peg. Tug gently on the working yarn to secure the loop on the peg.
5. Move to the next peg and repeat stitch as called for in the pattern.
Garter Stitch
1. Wrap the number of pegs as directed in the pattern until there are two loops on each peg and knit off one row.
2. The next row is done in purl stitch.
3. Alternate the rows in stockinette stitch and purl stitches as called for in the pattern. This creates a garter-stitch-look in your work.
Knitting a Flat Piece
1. Working around the loom clockwise, cast on the amount of stitches as directed in the pattern.
2. Wrap the last peg twice counter clockwise and bring your working yarn behind the next peg to the right. Wrap the yarn clockwise around the peg, Photo 7.
3. Continue to wrap the yarn around each peg clockwise working back toward the holding peg.
4. Starting with the last peg wrapped, knit off all pegs. The working yarn will be on the right end of the row.
Note: The stitch on the last peg that was double wrapped will be loose.
5. The working yarn will be behind the first peg on the right. Bring the yarn around to the front of the first peg wrapping in a counterclockwise direction.
6. Continue wrapping all pegs, working in a clockwise direction on the loom and knit off, again starting with the last peg that was wrapped.
7. Continue in this manner wrapping the pegs back and forth on the loom as directed in the pattern.
Note: Remember each peg will be wrapped clockwise as you move from left to right. Then they will be wrapped counterclockwise as you move right to left on the piece.
Purling on a Flat Piece
1. Cast on and wrap as many pegs as directed in pattern working in a clockwise direction.
2. Wrap the last peg and bring the working yarn around the left side of the last peg and in front of the peg just below the first loop.
3. Using your knitting tool, reach down through the wrapped loop on the first peg, and pull the working yarn up and through the loop, forming another loop.
4. Pull the original wrapped loop off the peg, and place the newly formed loop on the peg. Tug gently on the working yarn to secure the loop on the peg.
5. Continue to purl to the end of the row or as directed in the pattern.
Bind Off
There are four ways to bind off your finished piece: gather method, flat piece method, tube method and flat closed method. The gather method can be used to close up items like the tops of hats where the piece is a tube and then one end is gathered to close it. The flat piece method is used when making flat pieces such as scarves or afghan panels. The tube method can be used for items such as sleeves, where a circular piece is desired and both ends need to be left open. Flat closed method is used when knitting a piece in the round and a straight bottom is desired such as for a bag or pouch.
Note: It is helpful to have a crochet hook for some bind off methods; otherwise the knitting tool can be used.
Gather Method
1. Once the piece reaches the desired length, wrap your working yarn around the loom one and a half times; cut the yarn.
2. Using a yarn needle, thread the working yarn through each loop on the loom. Start with the loop to the left of the holding peg and work in a clockwise direction all the way around the loom, Photo 8.
3. Thread the working yarn through the loop to the left of the holding peg a second time.
4. Remove the loops from the loom and gently tug on the yarn tail until the piece gathers tightly together, Photo 9. Using the needle, secure the working yarn on the inside of the piece.
5. Turn the piece inside out and weave in the ends.
Flat Piece Method
1. Work piece until desired length as directed in pattern, ending with your working yarn at the right next to the holding peg. Cut the working yarn leaving a 3-inch tail.
2. Starting at the side of the piece with your working yarn, take the last loop from its peg and place it on the knitting tool or crochet hook.
3. Take the working yarn and wrap it once around the knitting tool or crochet hook in a clockwise direction. Pull this loop through the loop already on the crochet hook.
4. Remove the loop from the next peg to the right and place it on the hook, Photo 10.
5. Pull the second loop through the first and slide the first loop off the hook.
6. Repeat from step 3 and continue until all loops are removed from the loom.
7. After removing the last loop from the loom, use your hook to pull the tail of working yarn through it. Weave in ends with yarn needle.
Tube Method
1. Work piece until desired length as directed in pattern. Cut your working yarn leaving a 3-inch tail.
2. Start at the peg just to the right of the holding peg. Remove the loop from its peg and place it on the knitting tool or crochet hook.
3. Remove the loop from the next peg to the right and place it on the hook.
4. Pull the second loop through the first and slide the first loop off the hook.
5. Remove the next loop to the right and repeat.
6. Continue in this manner until all loops are removed from the loom.
7. After removing the last loop from the loom, use your hook to pull the tail of working yarn through it. Weave in ends with yarn needle.
Note: You can make the tube looser if you use a crochet hook and make one chain stitch between each loomed stitch as in the Flat Piece Method.
Flat Closed Method
1. Work piece until desired length as directed in pattern. Cut yarn leaving a 3-inch tail.
2. Thread a yarn needle with a piece of yarn in the main color (MC) around 1–2 yards in length.
3. Starting at the peg indicated in the pattern, thread the yarn up through that loop, Photo 11, and remove it from its peg.
Note: A contrasting yarn color was used in Photo 11 for illustration purposes only.
4. Move to the peg just to the left of the first loop removed. Thread the yarn through this loop as well and remove from the loom.
5. Next move to the peg just to the right of the first loop removed. Thread the yarn through this loop and remove it.
6. Continue to alternate left to right across the loom threading the yarn through the next peg and removing it from the loom until all the loops are removed from the loom.
7. Once all the loops are removed, gently pull the yarn through the loops being sure not to gather the piece.
8. Thread the end of the yarn through the corner and inside the pieces. Turn the piece inside out and secure the end. Weave in ends with yarn needle.
Making a Brim or Cuff
1. Knit in the round as many rows as directed by your pattern.
2. Reach inside and pull up the first row of cast-on stitches. These will tend to be looser than the other stitches.
3. Starting with the first peg, place the loops from the cast-on edge on each peg of the loom, Photo 12.
Make sure that each peg has two loops.
4. Knit off pegs by pulling the bottom loop up and over the one you just placed on the peg.
5. Wrap and continue to knit as directed in the pattern.
Note: The first row after bringing the brim up will be very tight.
Changing Colors
1. Cut yarn of first color leaving a 3-inch tail.
2. Form a slip knot leaving a 3-inch tail on the end of the new color yarn.
3. Place the slip knot over the holding peg or on the empty peg available on the loom.
4. Wrap and knit with the new color of yarn as directed in the pattern.
5. Remove the slip knot from its peg once three to four rows have been knit.
Shaping Pieces
Sometimes a pattern calls for increasing stitches and decreasing stitches to shape a piece. This is very easy to do.
Increasing One Stitch per Row
1. Take the loop on the end of the row you want to increase and lift it off its peg, placing it on the next peg away from the main part of the row. This will leave an empty peg between your main row and the peg with the loop you just moved, Photo 13.
2. Wrap all pegs including the empty peg and knit off all pegs with two loops. On the next row, that peg will have two loops and will be knit off with the rest of the row.
Increasing More Than One Stitch per Row
1. Wrap the number of pegs called for on the next empty pegs at the end of your row.
2. Knit off the loops on the main row then turn and wrap all the pegs including the extra pegs and knit off.
Decreasing One Stitch per Row
1. Take the loop on second peg in from the end of the row you wish to decrease. Place it on the third peg in from the end of the row, Photo 14.
2. Move the loop on the last peg in the row to the peg that was left empty by the one that was removed.
3. Wrap all the pegs that have loops on them; the decrease peg will have three loops on it.
4. Knit off all pegs. When knitting off the decrease peg, take the two bottom loops and pull them up and over the top loop and over and off the peg.
Decreasing More Than One Stitch per Row
1. Take the last loop on the end you wish to decrease off its peg and place it on the next one in.
2. Pull the bottom loop up and through the upper loop as if purling, removing the upper loop from the peg, Photo 15.
3. Repeat steps 1 and 2 until desired number of stitches are bound off, placing the last loop on the next peg in.
4. Wrap all pegs with loops remaining on them. The last peg will have three loops.
5. Knit off all pegs. Knit off the last peg by lifting the bottom two loops up and over the top loop.
I-Cords
I-cords make great handles for bags and can be used as edges for throws or blankets as well. They are very easy to do on a knitting loom.
1. Cast on and wrap number of pegs as indicated in your pattern.
2. Turn and wrap them as for knitting a flat piece and knit off.
3. Take the end of the working yarn behind the pegs from the peg on the right and over to the last peg on the left, Photo 16.
4. Wrap the pegs from left to right and knit off starting with the last loop wrapped. Pull down on your work to set the stitches, Photo 17.
5. Continue in this manner until the I-cord is the desired length. Bind off following the Flat Piece Method (see page 7).
CHAPTER 2Pleasing Ponchette
** EASY
Size
Woman's small (medium, large). Instructions are given for smallest size, with larger sizes in parentheses. When only 1 number is given, it applies to all sizes.
Finished Measurement
Chest: 36 (40, 44) inches
Materials
• Red Heart Super Saver medium weight yarn (7 oz/364 yds/198g per ball): 1 (1, 2) ball light periwinkle #347 (A)
• Moda Dea Dream medium weight yarn (1.76 oz/93 yds/50g per ball): 3 (3, 4) balls lavender #3502 (B)
• Yellow Knifty Knitter circle loom with 41 pegs
• Knitting tool or crochet hook
• Tapestry needle
• Safety pins
Gauge
10 stitches and 8 rows = 4 inches in Stockinette stitch Be sure to check gauge.
Stitches Used
Stockinette Stitch: Knit every round.
Chain Stitch: Yarn over knitting tool or crochet hook, draw loop through loop on hook.
Instructions
Front/Back
Make 2.
1. Starting on the first peg to the left of the holding peg and with 1 strand of A and B held together, cast on 3 stitches. Knit 2 rows in Stockinette stitch(see Stitches Used).
2. Wrap pegs 4–6 as for a flat piece and wrap pegs 6–1 and knit off.
3. *Knit 1 row. Wrap 3 more pegs and turn as for a flat piece. Wrap all pegs and knit off. Repeat from * until there are 39 pegs in use.
4. Mark the stitch on peg 39 with a piece of waste yarn or safety pin. Knit even until the piece measures 15 (16, 17) inches from the marked stitch. End on the peg just to the left of the holding peg.
5. Wrap and knit 36 stitches. Turn and wrap the same stitches and knit off.
6. Continue in this manner reducing the number of stitches by 3 every other row until only 3 stitches are wrapped. Knit those 3 stitches off ending at peg 1. Cut yarn.
Finishing
7. Using knitting tool or crochet hook, remove the piece from the loom by binding off following the Flat Piece Method (see page 7), making 1 Chain stitch(see Stitches Used) between each loom stitch for a looser edge.
8. To seam, place the 2 pieces right sides together with edge B of 1 piece and edge C of the other together. Using 1 strand of A and yarn needle, work your way back and forth up the edges of the 2 pieces, catching a bump on the edge of each piece, alternating sides. This makes a smooth invisible seam. Repeat for the other side.
9. Weave in all ends.
CHAPTER 3At-Home-Comfort Socks
*** INTERMEDIATE
Sizes
Woman's shoe size 5/6 (7/8, 9/10). Instructions are given for smallest size, with larger sizes in parentheses. When only 1 number is given it applies to all sizes.
Materials
• Wool-Ease Chunky bulky weight yarn (5 oz/153 yds/140g per ball):
2 (2, 2) balls bluebell #107 (A)
1 (1, 1) ball deep rose #140 (B)
• Blue Knifty Knitter circle loom with 24 pegs
• Knitting tool or crochet hook
• Tapestry needle
Gauge
12 stitches and 15 rows = 4 inches in Stockinette stitch Be sure to check gauge.
(Continues...)
Excerpted from Learn to Knit on Circle Looms by Denise Layman. Copyright © 2014 Annie's. Excerpted by permission of Annie's.
All rights reserved. No part of this excerpt may be reproduced or reprinted without permission in writing from the publisher.
Excerpts are provided by Dial-A-Book Inc. solely for the personal use of visitors to this web site.